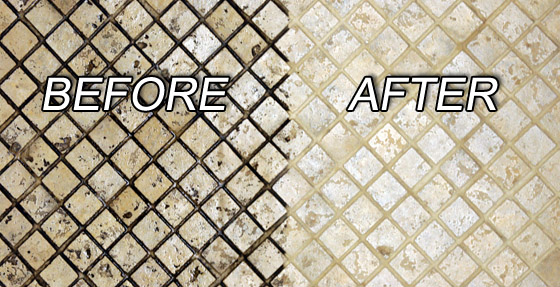
One of the worst parts of having a beautiful tile floor, are the dark nasty mildew stains often occur in grout lines found in bathrooms and other wet environments. Luckily it isn’t that difficult to remove these, as long as you’re willing to apply a little elbow grease.
The main tool used to clean grout lines is going to be a small, specialty brush known as a grout brush. In a pinch an old toothbrush can sometimes be substituted for this.
The idea is to have a tool that is small and narrow enough to allow you to work in between the tiles without scratching their surface.
Note: The edges of tiles are often their most vulnerable spot, so be careful when cleaning grout lines.
Conventional Grout Cleaning Method
The traditional way to clean grout lines is using household chlorine bleach.
The brush is dipped in the bleach, and then the grout is thoroughly scrubbed.
Wear old clothes as the bleach will tend to splatter. Make sure that windows are open and the area is well ventilated.
In some cases you may want to let the bleach set in the grout lines for several hours, and then attempt scrubbing them again to remove tough, set in stains.
When complete, a solution of baking soda and water can be wiped over the floor to remove the chlorine smell.
The final step is to thoroughly mop the floor with clean water, rinsing the mop periodically to ensure that all bleach is removed from its surface.
Important: Keep all pets and small children away from the floor while the bleach is setting into the grout lines.
Keep the windows open and the room ventilated so that toxins are not allowed to settle.
Drawbacks
Bleach is toxic, and its use can release harmful vapors into the air.
The use of bleach will change the hue of colored grout lines over time.
Professional Grout Cleaning Method
If you have a particularly difficult stain to work on, then you have a variety of powerful commercial grout cleansers that you can choose from.
Most commercial grout cleansers are powerful acid based agents that can be dangerous to work with if you do not take the proper precautions. Always follow the exact instructions on the label.
For your protection, you will want to wearrubber gloves, eye protection, and in some cases a breathing mask. You will also want to make sure that the area is very well ventilated, and in some cases you may want to use a fan to ensure that toxins do not settle.
You want to start out using a weak, water diluted solution of the cleanser. If necessary, increase the strength as you work.
Apply it using a professional quality grout brush, and then allow it to settle into the grout for about 45 minutes.
When you are done, thoroughly mop the tiles with clean water in order to completely remove cleaning agent. Allow the area to dry thoroughly before letting anyone to use the room.
Green Grout Cleaning Methods
The traditional green grout cleaning method uses a solution of 50% hydrogen peroxide and water. This is applied directly to the grout lines using a damp sponge, brush, or spray bottle. Allow the solution to sit for ten minutes, and then reapply it if necessary.
After three tries, mix the peroxide solution with baking soda, and then apply that to the grout lines. Allow that to sit until dry, and then vacuum up the baking soda.
This can be combined with scrubbing using a grout brush in order to increase the efficacy of the treatment.
The drawback to this method is that it is not very strong, and it may take several applications before you see any results. In the case of extremely hard, set in stains, it may not be effective at all.
Oxygen Bleach
Unlike Chlorine bleach, oxygen bleach is non-toxic, safe for the environment, and doesn’t have a harsh chemical odor. They also do not stain colored grout lines. Hydrogen peroxide is a form of oxygen bleach; however it is generally sold in diluted solutions, making it a relatively ineffective cleanser.
Cleansers such as Oxiclean and Biokleen are sold in powder forms which contain high percentages of oxygen bleach. These can be turned into paste of water solutions which can then be applied to the grout lines directly for a powerful, non toxic cleaning effect.
Allow the agent to sit on the grout for 5-10 minutes, and then scrub the lines with a grout brush in order to remove loose stains. Immediately wipe the floor clean with a damp cloth to remove any excess dirt and prevent it from settling back into the grout.
Sealing Your Grout Lines
Cleaning grout lines can be a difficult and physical process. Once you have the floor looking clean and stain free, sealing the grout will create a protective surface over it that will prevent further dirt and mildew from sinking into its porous surface.
Wait until your grout lines are completely dry. You will want to give them at least 24 hours to ensure that there is no lingering moisture in their pores.
Choosing a sealer: There are many different grout sealers that are available to you. Some people worry that sealers, being chemical agents, may have toxic properties which are not necessarily listed on the label. If you are concerned about this, you will want to purchase a water based formula. Apply it using a foam brush, and then allow it to dry for an hour or two before using the room.
–ABOUT.COM

